Bar/Choice Summer Pockets Deck Profile
This is a deck profile I wrote for a now-defunct community project. Even if that project starts back up again, these decks are no longer meta relevant. I didn't want to lose the writing, so I'm copy-pasting them here. Enjoy over coffee at your leisure.
---
Reflection Blue changed a lot for Summer Pockets. No longer shackled to the now dicey investment of Shiroha, the set became free to explore more stable and traditional options.
SMP quickly rocketed to the status of tournament threat in the current metagame due to the utilization of its unique older options while receiving quite a few new ones, but determining which of them to build around proved to be a bit of challenge. An expanded high-quality card pool allows SMP to fairly easily adapt to the ebb and flow of a changing metagame, so today I’ll be running down a generalized build that aims to answer a “blind” field. I’ll also cover alternative choices, so you can tune your personal build of Pockets to best respond to your own meta.
Before we can get into the deck proper, no discussion about SMP can begin until we first give a primer on the set’s most stand-out card:
【A】When this card is placed on Stage from Hand, look at up to X cards from your top Deck, choose up to 1 card, add it to Hand, place the remaining cards into the Waiting Room. X is equal to the number of your 《サマポケ》 Character.
【A】【CXCOMBO】[(1)] When this card attacks, if (Choice CX) is in your Climax Slot, and this card has 3 or less Soul, you may pay the cost. If you did, during this attack, when this card deals attacking Damage to the opponent, deal X times 1 Damage to the opponent instead. X is equal to the number of this card's Soul. (This does not consider as 【A】 effect Damage. Damage can be cancelled)
This effect turned heads 360° when it was revealed in spoiler season, and rightfully so. Converting all of your soul damage for the turn into instances of one is incredibly consistent for closing out games, all but guaranteeing your win if you manage to resolve three copies of her when your opponent is at 3-0 or higher. Don’t let her one soul fool you; Shiki can easily burn you for four instances of one on just one attack with her available support cards. To make matters worse for your opponent, the only way for them to deny Shiki’s effect is to use some form of anti-damage or neg-soul counter since her effect isn’t considered an AUTO ability for ruling purposes. Add in her topcheck ability to confirm her own climax for combo, and you have one monster of a finisher to build your deck around.
Shiki isn’t without her problems though, notably her deceptive lack of reach. Since she doesn’t push any extra instances of damage outside of converting her own attack, even tri-fields of this combo aren’t likely to end games from the higher end of level 2 like some of the other potent finishers out there. She also needs to have a specific support card on the board and an “all in” line of end-game setup to be most effective. Thankfully, Summer Pockets has more than enough tools to consistently play the long game, conservatively healing down turn after turn until the time arises to slam Shiki to the board and end the game.
Decklist & Card Explanations
As usual, we’ll start off by showing the whole deck laid out:

Choosing to shift towards the green package post-Reflection Blue should come as no surprise; the package was always decent, but lacked payoff cards past level one. With the addition of the Tsumugi early-play in the new booster, SMP now has a rock-solid midgame to match its early prowess. Notably, the shell has a few available flex spots that you can utilize to adapt to what you expect to see, keeping an available “sideboard” of sorts where you can slot in and out cards depending on the meta ahead. Like I said earlier, after I go through each of the cards in this specific list, I’ll go through those other options as well. There is likely one specific card choice here that you might find suspicious, but stay with me here; all will be answered in time.
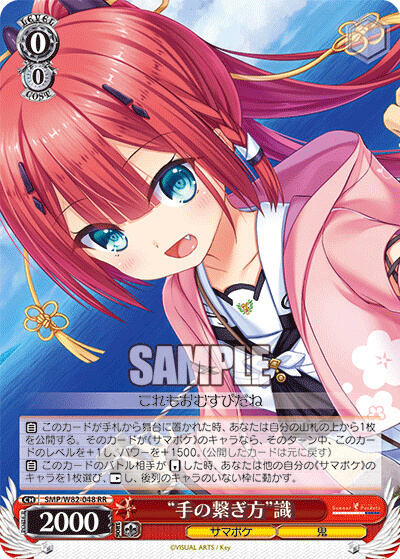
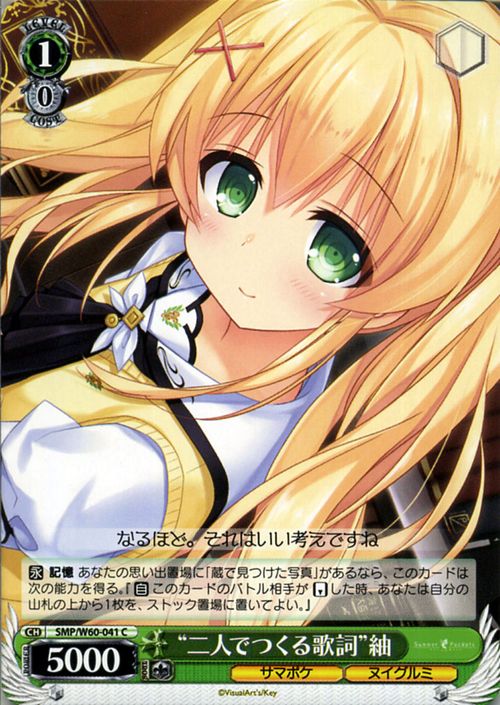
【A】When this card is placed on Stage from Hand, reveal the top card of your Deck. If that card is a 《サマポケ》 Character, during this turn, this card gets +1 Level and +1500 Power. (Return revealed card to its original position)
【A】When this card's battle opponent becomes REVERSE, choose 1 of your other 《サマポケ》 Character, REST it, move it to an empty slot at Back Row.
Finally, a good field plus for Summer Pockets. Before Reflection Blue, we had to deal with either a freerunner or a coinflip if we wanted one of these, neither of which were ideal. You’ll notice that we don’t have a large amount of available clean cut targets (just Shiroha Brainstorm and the 1/1 Shiki support), but this card still shines as a tri-lane enabler. We have a lot of abilities we’ll be paying one for throughout the early and midgame, so anything that helps us generate some extra stock is more than welcome. We’re also a deck that would prefer to hit level one second in most matchups, since our combo swings in at a fairly high power line, so Shiki is free to do her job with reckless abandon most of the time. Her topchecking ability also holds relevance throughout the game to give us knowledge of our top trigger before heading into attacks, particularly when we head into our 3/2 Shiki combo turn. After a couple events go to memory, she’ll be able to swing it at some pretty big numbers for a clean cut, so don’t forget to look for reverse opportunities all game long.
4x “It’s Free Real Estate” Shiroha

【A】When this card is placed on Stage from Hand, if your Memory has 2 or less cards, you may choose 1 「“サマードレス”しろは」 from your Waiting Room, send it to Memory.
【A】When this card becomes REVERSE, you may reveal up to 3 cards from your top Deck. If 1 or more card is revealed, choose up to 1 《サマポケ》 Character among those cards, add it to Hand, place the remaining cards into Waiting Room, choose 1 card from your Hand, place it into Waiting Room.
I feel like every set gets an on-reverse Rize these days. While the timing of this variation is undoubtedly worse than it’s on-play parent, the benefit of additional costless deckspeed and early game filtering is worth putting up with. However, unlike her contemporaries, Shiroha sends a copy of herself from grave to memory on play for some extra free compression on our next refresh. With the biggest issue of this profile being that it loses its relevance as the game drags on, deleting extra copies of herself makes Shiroha a far more attractive option. We can freely run the maximum of four copies so that we’ll be able to rip through our first deck quickly, but not have the card feel relatively dead later on. Don’t be afraid to clean cut this Shiroha either if you can set up a trade; getting two turns of back-to-back mill on your first deck is a great way to make sure you hit a good refresh even if it pushes off the generation of the free memory.
3x “Pirate Maid Panic!” Kamome
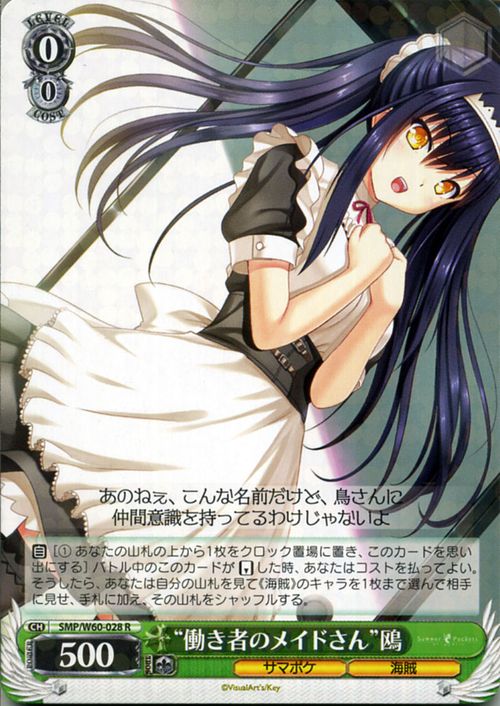
【A】[① Place the top card of your Deck into Clock, send this card to Memory] When this card becomes REVERSE, you may pay the cost. If you did, search your Deck for up to 1 《海賊》 Character and show it to opponent, add it to Hand, shuffle your Deck afterwards.
So long as we’re running a Kamome as our level one combo, Kamome Riki is always going to be a worthwhile include even if our overall number of ::Pirate:: trait characters is low. She gets a good bit of extra points for being a memory Riki, as she can pay for her own cost by getting an attack in. As a primarily clean cut deck, we’d typically be a lot less effective if we happen to go first, but this card fixes that problem by giving us a proactive opener that helps sculpt us for our level one game while also being a trifield enabler. Don’t be afraid to use her to just grab another copy if you happen to get some cancels at zero. Even if we don’t mind being locked due to our good clean cut, extra cards and attackers are always good.
3x “LOLIFICATION BEAM” Shiroha

【A】 When this card is placed on Stage from Hand, look at the top card of your Deck, place it on top Deck or Waiting Room.
【S】 CONCENTRATION [① REST this card] Flip the top 4 cards of your Deck, place them into Waiting Room. For each Climax among those cards, choose up to 1 Character from your Waiting Room, return it to Hand.
A five-card Brainstorm on a stick. This card was always a massive over-performer before Reflection Blue, and not much about that has changed. Surveil is an effect that is quite literally always useful, letting us set our trigger, get a better Brainstorm, or just move an extra card when we need to. There’s the obvious synergy of using this card with our clean cut, ensuring that we always get the power pump if we’re going to clean cut this Shiroha to the backrow, but she also has utility on our finisher turn. We can use the surveil to make sure our top card has the highest possible chance of having a soul trigger, making our Shiki finishers get four pings more consistently. A great Brainstormer that any set would be happy to have.
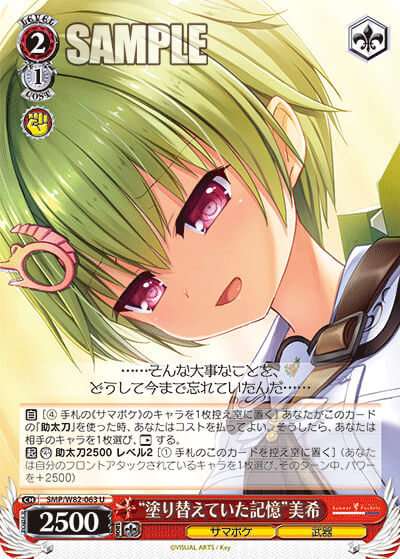
3x “Otherworldly Idiocy” Tsumugi
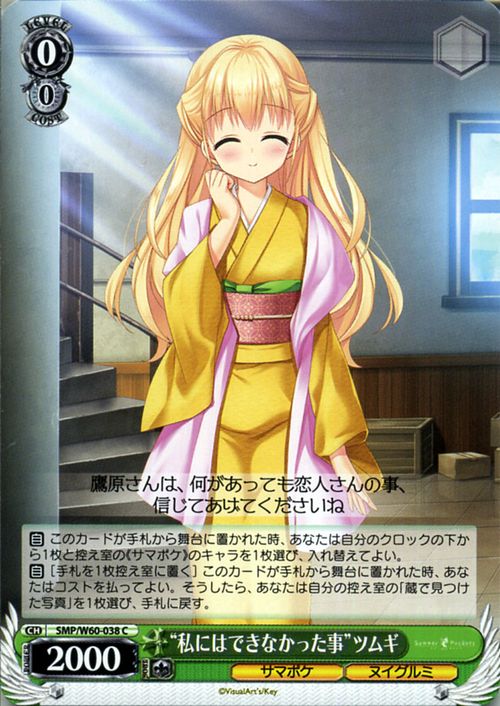
【A】 When this card is placed on Stage from Hand, you may choose 1 card from your bottom Clock and 1 《サマポケ》 Character from your Waiting Room, exchange them.
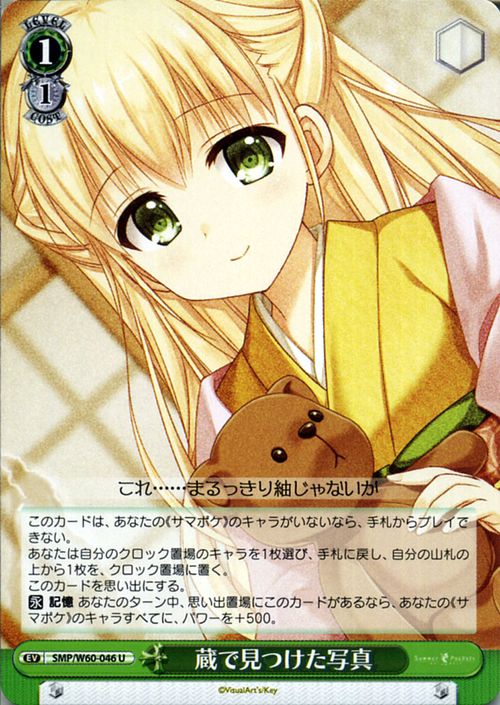
【A】[Place 1 card from Hand into Waiting Room] When this card is placed on Stage from Hand, you may pay the Cost. If you did, choose 1 「蔵で見つけた写真」 from your Waiting Room, return it to Hand.
This is one of the main reasons we’re going into the green package. Tsumugi helps us filter our hand while setting up a delayed salvage with the event she bonds to. Ditch outs when we’re running Bar are always welcome, so she does double-duty here with assurance that we’ll always be able to resolve multiple Photos. Manipulating the bottom card of our clock can also help us temporarily set colors (typically yellow) to get our 1/1 Shiki support out on the board early when the situation demands it. With the amount of healing we’ll be doing at level 2, it’s not uncommon to use this card just to manipulate our clock in a way so that we don’t end up removing crucial cards from the game by burying them in our stock or other zones. Not a lot of sets get access to this kind of effect, and the power of extra color consistency when we’re running a 3 color deck with cards of each color scattered at different levels makes color-whiff a total nonissue.

【A】[(1) Place 1 card from Hand into Waiting Room] When this card is placed on Stage from Hand, you may pay the cost. If you did, search your Deck for up to 1 《サマポケ》 Character and show it to opponent, add it to Hand, shuffle your Deck afterwards.
Your standard drop search profile. We’re primarily a deck that salvages, so having an option for on-demand deck access is always nice when we aren’t running a level one combo that’s particularly selective. This is mostly in this specific list just for consistency; if there’s a card at level zero that fits your meta’s needs, this is your go-to flex spot. Changing a color in this position doesn’t negatively affect any of the list’s ratios, so feel free to put in whatever is necessary here.

【A】[ Return 2 Character from your Waiting Room into Deck, shuffle your Deck afterwards] When this card is placed on Stage from Hand, you may pay the cost. If you did, during this turn, this card gets +1 Soul.
【A】[(1)] When this card's dealt Damage is cancelled, you may pay the cost. If you did, you draw 1 card.
Shizuku has some limited use as a pay-one-plus and deck manipulation tool, but she’s mainly in the deck for one big reason: to shuffle back soul triggers on our finishing turn after milling out our deck with our Shiki’s topchecks. Since Shiki moves a lot of cards on her own accord, it’s not unlikely that you’ll be able to easily get down to a 1-2 card deck before going into your attack step. Shizuku lets us take our typically low chance of triggering a soul trigger and make it somewhere between 50-66% at worst. If you’re on top of your soul trigger count going into your last deck, you could even make this 100%. Be sure you’re obsessively tracking your number of triggers you refresh for your last deck, and as you mill for your Shikis. Usually, going for this sort of line wouldn’t be very good since milling out our likely compressed deck means our chance of surviving our opponent’s followup turn is poor, but remember: you should only be going for your Shiki finisher when you believe your opponent is sure to lose. This Shizuku can easily make Shiki into an absolute checkmate, so make sure you’re using the card to its fullest potential.
4x “Underappreciated Pirate-chan” Kamome
【A】【CXCOMBO】 When this card attacks, if (Gold Bar CX) is in your Climax Slot, and you have 2 or more other 《サマポケ》 Characters, reveal 2 cards from your top Deck, your opponent chooses 1 Character or Event among those cards, add it to your Hand, place the remaining cards into Waiting Room.
【A】 When this card attacks, if you have 2 or more other 《サマポケ》 Characters, during this turn, this card gets +2000 Power.
This is the card I was referring to when I said there was probably a card choice some would disagree with, but hear me out. Set one Kamome has a couple benefits over her new better-dressed sister, namely being her consistently higher power line. On your turn, she’s always going to swing in at 6500 minimum, 7500 if you’re slamming her climax and even more if you’ve managed to play a couple Photos events. She always gets the power, so she doesn’t warp your lines of play like the new combo’s on-play power can. This also makes her a better target for possible clean cut plays, as she’ll be able to swing big again on followup turns when she returns to the front row. Her cross-turn power line was also relevant after a lot of testing; in games where your opponent is struggling, mounting 4500-5000 is significantly harder than just tying 4000, increasing the chances that you’ll be able to play your climax combo again by a small percentage. Combine all this with the relatively minimal differences between the combos themselves other than this one being purely on-attack, and the set one Kamome comes out on top as our pick going into a blind field. I’ll highlight reasons for why you’d possibly want to play other options after I get through the whole list, but in comparing our options for combos off Bar, this one is the clear winner when you don’t know exactly what you’ll be playing into.

If you have no 《スマポケ》 Character, you cannot play this card from Hand.
Choose 1 Character from your Clock, return it to Hand, place the top card of your Deck into Clock.
Send this card to Memory.
【C】 RECOLLECTION During your turn, if this card is in your Memory, all of your 《サマポケ》 Characters gets +500 Power.
A compression neutral delayed salvage that gives you a rolling power buff for every copy you resolve. This (and the early-play we’ll talk about later) are our main reasons for slotting into green, and playing an on-color level one climax combo. Combined with Tsumugi bonder’s clock manipulation, you can turn your clock into cards from your grave while converting your random additions from the top of your deck into cards that you need. After just one of these, your Kamomes are swinging over 1/1 Standby targets, clean cuts are hitting 5000 without any additional buffs when you’re playing a climax, and your early-plays will be even more obnoxious to deal with than they already are. There’s the obvious benefit of simply confirming extra copies of your Kamomes that happened to go to clock at level zero, but the versatility of this effect goes farther than that. Combined with your topchecking abilities, you can easily rip five, six, or even seven card Brainstorms since Photos moves your top card, all while being comfortable with your stock investment by generating memory. Still, you might be a bit scared off of spending all this extra stock for salvages when we want to be spending it on healing in the midgame (and popping off later with our Shiki finisher), but fear not:

【C】 RECOLLECTION If 「蔵で見つけた写真」 is in your Memory, this card gains the following Ability.『【A】 When this card's battle opponent becomes REVERSE, you may place the top card of your Deck into Stock.』
Yep, Photos also has a stocker as a payoff card. Having no other effect means her power baseline after one event will be 5500, and it’s only going up from there. You’ll be able to reliably snipe reverses with this all game starting at level one, making nearly every Photo you resolve stock neutral and compression positive. This card is a godsend for consistency, especially when combined with Choice trigger. You’ll regularly have turns where your attack step nets you five stock, fueling your heals for following turns. We’re only running two in this list, but I’ve seen people run this card as high as three, inverting ratios with the Tsumugi bonder. This is mostly personal preference, as I like having an abundance of ditch-outs for longer tournaments, but you can freely adjust these counts to your liking.

【C】SUPPORT All your 《サマポケ》 Character in front of this card gets +X Power. X is equal to that Character's Level x500.
【A】At the beginning of your Climax Phase, choose up to 2 of your 「“夏の思い出”識」, during this turn, they gets +1 Soul.
【S】[REST this card] Choose 1 of your Character, during this turn, it gets +500 Power.
We’re forced to run this card if we’re playing the Shiki finisher, so thankfully it’s a good one; this is probably the best level support that Summer Pockets has access to, full stop. It fights right in with our game plan of running out multiple early-plays at level two, making them fatter than our opponent can likely deal with. The extra +500 power is also a nice addition, giving us a reason to slam Shiki down at level one if we have the opportunity. Remember: her second effect is optional. You’re not forced to give any of your Shiki finishers a soul, so you don’t care if your opponent leaves you open lanes. In fact, having extra open lanes is preferable, as it gives you the opportunity to set up a 3-3-3 soul baseline for triple Shiki. You’re completely dependent on having this on board for your finisher, so make sure you select for it early and hold onto it.
【A】【CXCOMBO】[Return 1 of your other Character from Stage to Hand] When 「君を好きになりました」 is placed into your Climax Slot, if this card is at Front Row, you may pay the cost. If you did, choose up to 1 《時間》 Character with Level same or lower than your Level from your Hand, place it into any slot on Stage, during this turn, this card gets +3000 Power.
【A】 When this card becomes REVERSE, if this card battling opponent's Level is higher than your opponent's Level, you may place that Character into Stock. If you did, place 1 card from the bottom of your opponent's Stock into the Waiting Room.
Sometimes, you just need to get something the hell off of the board. Early-plays aren’t getting any less sticky these days, so I’ve found this card to be a bit of a necessity even with our own two early-plays swinging at pretty high numbers. However, this is the most flexy flex-spot in the list. If there’s something you like or need more than this card, feel free to sub something else in. Again, I’ll go over a couple other high-quality options for this slot after we get through the whole decklist.
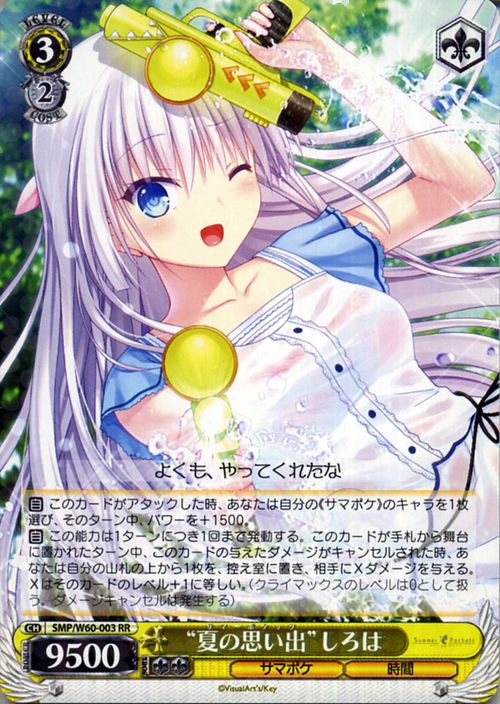
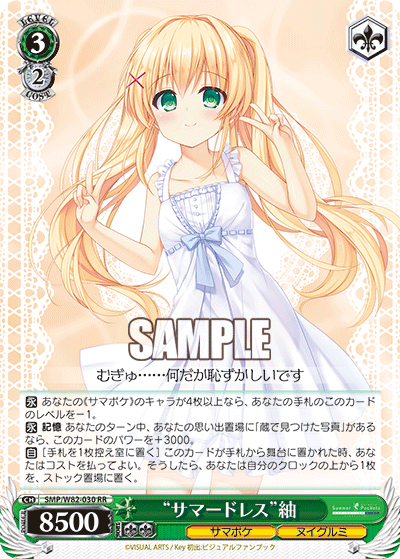
3x “Demonic Pringle Eater” Tsumugi

【C】If you have 4 or more 《サマポケ》 Character, this card gets -1 Level in your Hand.
【C】RECOLLECTION During your turn, if 「蔵で見つけた写真」 is in your Memory, this card gets +3000 Power.
【A】[Place 1 card from Hand into Waiting Room] When this card is placed on Stage from Hand, you may pay the cost. If you did, place the top card of your Clock into Stock.
I’ve said it before and I’ll say it again: one-stock early-play healers will always be good. Tsumugi breaks the general mold of Mesmerizing Water Goddess by requiring at least one Photo in your memory for her power condition, but your payoff for that is that she’ll start out swinging at a massive 12K. Combined with our level support and a couple more Photos, and she’ll be easily busting down any wall our opponent can throw in front of us. Since she has a four-or-more condition, we’re free to recur her turn after turn, constantly putting the pressure on our opponent by removing their threats while healing down. This is the primary way you’ll be biding your time until your opponent hits just the right damage threshold for Shiki to finish them off, so don’t be afraid to sculpt multiple copies for repeated turns.

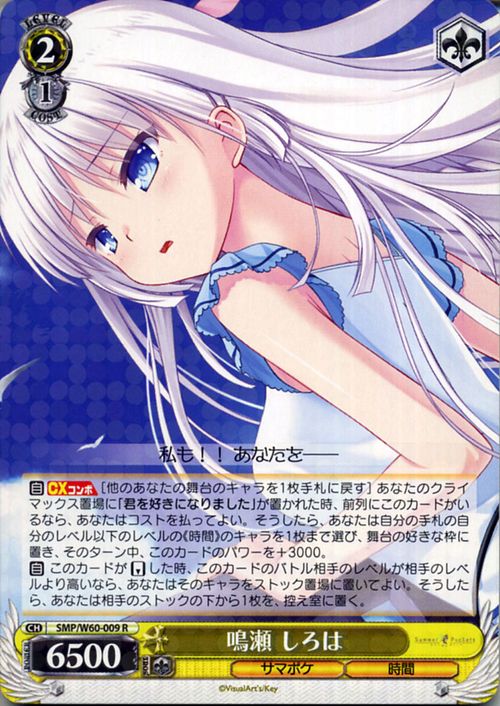
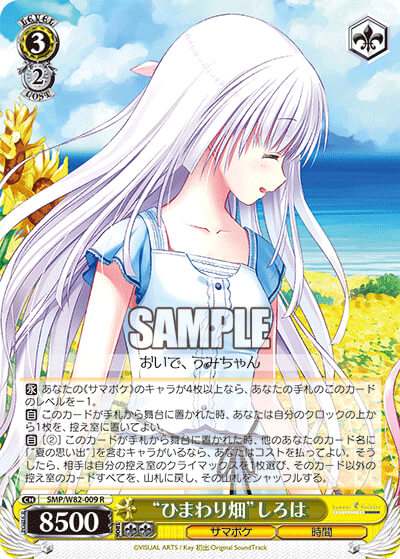
【C】If your Waiting Room has 2 or less Climax, this card gets -1 Level in your Hand.
【C】If you have 2 or more other 《サマポケ》 Character, this card gets +1000 Power.
【A】When this card is placed on Stage from Hand, you may place the top card of your Clock into the Waiting Room.
A pretty standard two-or-less healer, sitting at 10.5K crossturn. The combination of both early-play conditions means we can typically get two heals for three stock after our first refresh, stabilizing us for the beginning of our level two. In front of the Shiki support, this card will sit at 12K, just pushing over the threshold where early-plays will require your opponent to extend in some way to clear them. We’re running this Shiki over the Umi from the first set because we’d struggle too hard to meet her condition to heal to memory since not a lot of our characters have the ::Time:: trait.
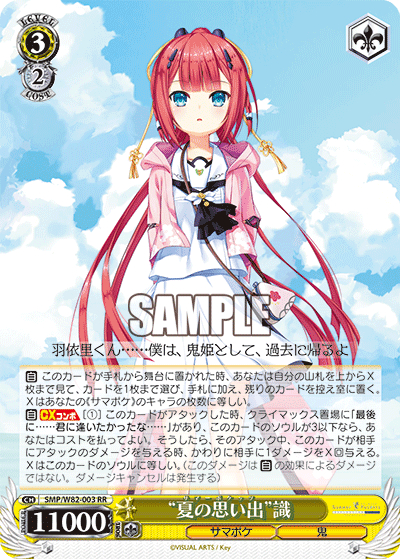
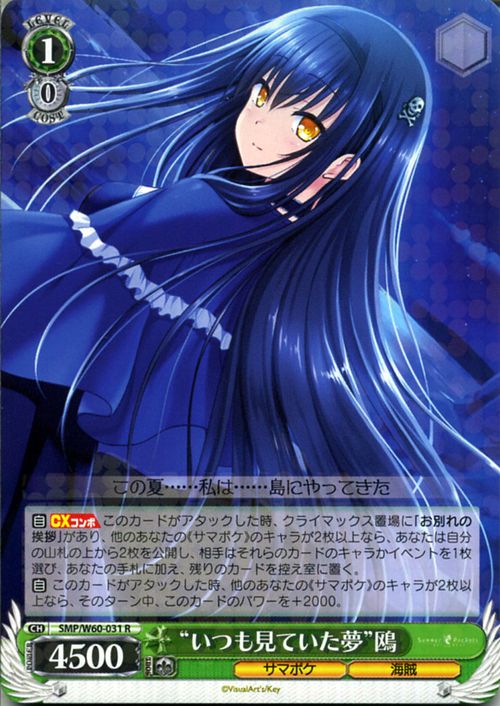
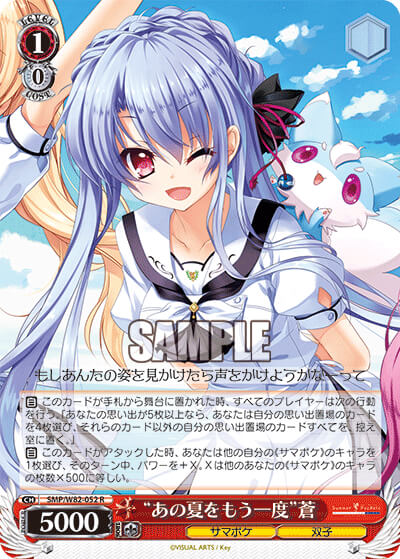
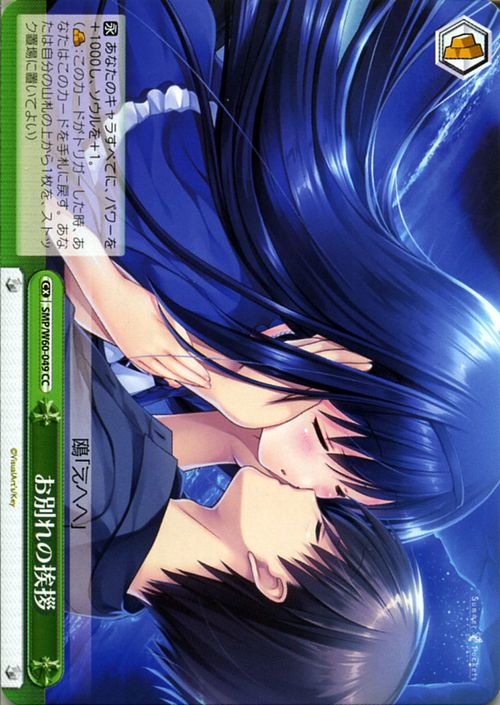
4x “Anti-Cancel Checkmate” Shiki
【A】When this card is placed on Stage from Hand, look at up to X cards from your top Deck, choose up to 1 card, add it to Hand, place the remaining cards into the Waiting Room. X is equal to the number of your 《サマポケ》 Character.
【A】【CXCOMBO】[(1)] When this card attacks, if (Choice CX) is in your Climax Slot, and this card has 3 or less Soul, you may pay the cost. If you did, during this attack, when this card deals attacking Damage to the opponent, deal X times 1 Damage to the opponent instead. X is equal to the number of this card's Soul. (This does not consider as 【A】 effect Damage. Damage can be cancelled)
We talked about this card above, so I’ll be brief: Shiki is an amazing card, but she has to be utilized correctly. This isn’t a finisher where you can just slam down two or three copies and expect your opponent to die from 2-4 or 2-5. She’s incredibly consistent at closing games no matter what your opponent’s level of compression, but she can really only do it from a maximum of 3-0. She’s not a card with high damage output, she’s a card with consistent damage output. If you keep this in mind and play towards a 3-0 to 3-2 kill, making conservative plays at every point before your last turn, you should have no trouble finishing your opponents. Be very aware of any sort of neg-soul or anti-damage effects your opponent might have access to; they’ll completely remove Shiki’s ability to do any damage at all, so you’ll have to play around them by trying to make sure you win board where you can so your opponent can’t play them effectively. Triple Shiki isn’t something you’ll typically play for, since you can only pump a soul to two lanes, but keep an eye on your stock threshold if the opportunity arises. It’s only seven stock to triple, so it’s not outside the realm of possibility if the game is going in that direction.
1x “Water Gun Dual-Wielder” Shiroha
【A】 When this card attacks, choose 1 of your 《サマポケ》 Character, during this turn, it gets +1500 Power.
【A】 This Ability can only be activated up to 1 time each turn. During the turn when this card is placed on Stage from Hand, when this card's dealt Damage is cancelled, place the top card of your Deck into Waiting Room, deal X Damage to your opponent. X is equal to that card's Level +1.(Climax is considered Level 0. Damage can be cancelled)
The last flex spot left in the deck. Since we’re effectively chipping our opponent out and Shiki has a pretty high base power line, having the ability to pump her over our opponent’s walls while ensuring some more chip damage can be pretty valuable. We’re also playing to stack our deck with soul triggers on our final turn, so Shiroha’s second effect has a higher chance of burning for more damage. If there’s something else you need in the deck for your meta, this is easily cuttable, but having a card like this that can do double-duty has extra value when you don’t exactly know what you’ll be queuing into.
Level 1 Options
Before I get into some of Summer Pockets’ tech card options, I’d like to discuss some alternative level one packages, and why you’d choose to play them alongside the Shiki top end. Set 1 Kamome is a great all-rounder when you don’t know what you’ll see in a long event, but if you have a good read on the meta you’re heading into, there are some other attractive choices between SMP’s two sets.

【A】When this card is placed on Stage from Hand, during this turn, this card gets +X Power. X is equal to the number of your 《サマポケ》 Character x500.
【A】【CXCOMBO】At the beginning of your Encore Step, if (Bar CX) is in your Climax Slot, and this card is at Front Row, and you have other 《サマポケ》 Character, there is no Character facing this card or it's REVERSE, you draw up to 2 cards. If you draw 2 cards, choose 1 card from your Hand, place it into the Waiting Room.
This Kamome from set 2 is the most directly comparable option to what we were already running, with a couple notable benefits and drawbacks. We still get to run Bar at level one, and are on-color for all our other green cards we want to resolve at that same level. We also gain a bit more filtering power with encore phase timing, letting us gain a small chance to have a marginally better deckstate when we pass back to our opponent. This all sounds like a straight upgrade to our chosen Kamome until you read the new one’s power condition: we’re likely not swinging at the full 7500 anywhere other than in one lane. This can negatively affect your sequencing in a way that leaves you more open to backups and counters, which is made all the more worse by this Kamome needing to win her lane to plus. Still, if you have a read that swinging in at her minimum 5500 power is more than sufficient (or if your locals are all playing stuff like Konosuba’s Megumin combo), you’ll get all the benefits without feeling the pain of most of the drawbacks.

【C】During your turn, if you have other 《サマポケ》 Character, this card gets +3000 Power.
【A】【CXCOMBO】[Place 1 《サマポケ》 Character from Hand into Waiting Room] When this card's battle opponent becomes REVERSE, if (Door CX) is in your Climax Slot, choose up to 1 《サマポケ》 Character from your Waiting Room, return it to Hand, and you may pay the cost. If you did, choose 1 《サマポケ》 Character or 「Summer Pockets」from your Waiting Room, return it to Hand.
If your meta is nothing but walls and Standby, Umi is your answer. Swinging in at 7000 power even before her climax is played, she can bust down 1/1s with ease while giving you a selective salvage and a free hand filter on top. Her power line helps her hold relevance all throughout the game, especially when paired with Photos events. Umi can easily be slotted into the existing list above without much massaging, as the count of red cards is already fairly high due to our clean cut and Brainstormer. This makes our level one dual color, but the payoff if our meta is playing for field is likely worth it. You’ll only opt to play this card if you’re comfortable being completely beholden to needing reverses; without the ability to plus other than Brainstorms and triggers, you’ll be left high and dry for cards if you can’t find any kills (or just happen to get extraordinarily lucky).

【A】【CXCOMBO】 When this card's battle opponent becomes REVERSE, if 「ラッキーアクシデント」 is in your Climax Slot, search your Deck for up to 1 《サマポケ》 Character and show it to opponent, add it to Hand, shuffle your Deck afterwards.
We normally would never be considering a vanilla Shimakaze as our level one advantage combo of choice, but Reflection Blue introduced an incredibly powerful support card that makes this Ao more than worth playing. By ripping her out of the deck, then getting a reverse, Ao will thin 2 cards from your first deck with her most common play pattern, increasing the chance of getting some dank first deck cancels. Since she’s a search, the selectivity lets you freely adapt to situations as the game develops. She also puts us firmly in blue, giving us access to some additional level 3 options that we might want to play over yellow or red auxiliary cards. Top that off with Pants trigger adding four extra soul triggers to our deck for our Shiki top end, and Ao is looking even finer than she already did.
However, Ao unfortunately introduces a slew of problems that make her hard to justify if you don’t perfectly know the field. First, she needs a reverse, and although that typically isn’t an issue with our shiny new support card pumping her to 7500 power, she’s especially weak to reverse-denial strategies. The bigger issue is deckbuilding restrictions; after including the necessary support cards and backups to help win the field with your Aos, you’ll quickly run out of space and likely be forced to cut the green package from the deck entirely. WIthout green, you’ll lose access to the Tsumugi EP that helps you desperately bide time while you wait for your opponent to enter Shiki’s kill range. If you’re confident in your ability to get the reverses you need and be able to push to kill range without needing to wait out your opponent’s repeated heals, Ao raises the ceiling of the deck dramatically. With a good portion of the western JP meta being focused on either stalling or playing an incidental abundance of healing, I don’t see a good reason to drop the green-focused strategy at this time. I’d love to play more of best girl and less of worst, so let’s cross our fingers for the future.
Flex Spot Options

【A】When this card is placed on Stage from Hand, choose 1 of your 《サマポケ》 Character, during this turn, it gets +1500 Power, gains 《カレー》.
【A】When this card attacks, choose 1 of your 《サマポケ》 Character, during this turn, it gets +1500 Power, gains 《カレー》.
If you’re still having trouble winning the field even after using the Photos package, you can always opt to slot in a copy or two of this Shizuku. She’ll give up to 3000 power anywhere, which is nothing to sneeze at even going into the late game. You can use her to confirm your clean cuts all throughout the game (while also being a decent target herself), or just edge your other characters over your opponent’s suspected backups. If you’re opting to play any of the on-reverse combos in the set, this card is at even more of a premium especially when you expect to queue into a good bit of Standby.
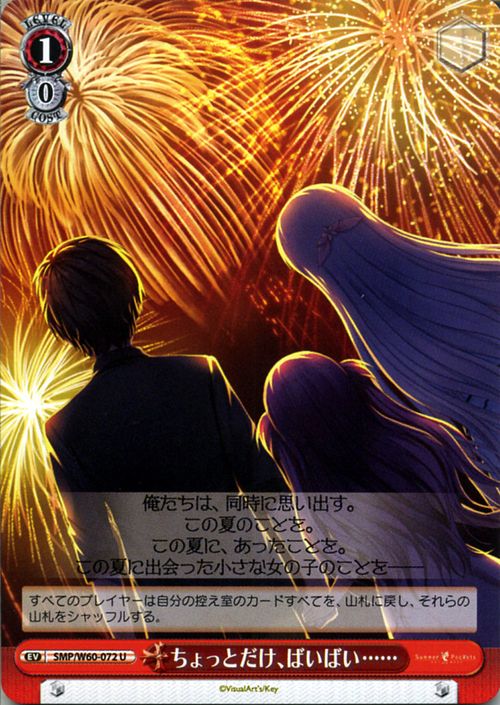
All Players return all their cards from Waiting Room to Deck, shuffle the Decks afterwards
Mutual freefresh effects are typically a good include if a deck can adequately support them, especially when your set is hard up for decompression effects otherwise. Unfortunately, SMP isn’t a deck that has good access to its event cards outside of drawing them. Remember: our Photos events can only add characters from our clock, so you won’t have the opportunity to pick up this card like Fate can. Yes, Shiki can add this off of her topchecks, but we’d rather mill our deck out to set some soul triggers rather than freefresh them all away. This event is most commonly used to band-aid our own deckstate since we are a bit hard up for deck manipulation tools later in the game. If you feel that it’s necessary, feel free to make cuts in order to jam in two or three of this card; without a bond, you’ll have to draw and hoard this card to be able to use it at all.
【A】When this card is placed on Stage from Hand, both players perform the following Action. 『If your Memory has 5 or more cards, choose 4 cards from your Memory, place all cards from your Memory into Waiting Room except for those 4 cards.』
【A】When this card attacks, choose 1 of your other 《サマポケ》 Character, during this turn, it gets +X Power. X is equal to the number of your other 《サマポケ》 Character x500.
If the meta ever returns to the generation of Saekano levels of memory compression, this Ao is your 1-card out. The part where your opponent gets to keep four of their cards means that you likely won’t be screwing over any specific conditions, but you might be able to worsen their refresh by a good few cards if they’ve been investing heavily in their memory. The time for this effect to truly shine has come and passed, but if memory ever rears its ugly head again in an oppressive way, Ao can easily be slotted into nearly any Summer Pockets list.
“Totally Not Priscilla” Nomiki
【A】[(4) Place 1 《サマポケ》 Character from Hand into Waiting Room] When you used this card's 『ASSIST』, you may pay the Cost. If you did, choose 1 of your opponent's Character, REST it.
【S】【COUNTER】 ASSIST 2500 Level 2 [(1) Place this card from Hand into Waiting Room] (Choose 1 of your Characters being Front Attacked, during that turn, it gets +2500 Power)
Your standard tap counter. If you don’t see the need for the anti-change bomb at level 2, heavily consider replacing it with this Nomiki. Since you can ramp a lot of stock going into your later turns with the Tsumugi stock charger and Choice trigger, this card is an active threat a lot more often than you’d think for a deck that typically plays towards a big finisher turn. It also adds a counter to the deck, letting you more easily protect your early plays if the opportunity arises. The benefit of devastating defensive effects like this to your deck is twofold: you give yourself an out on your opponent’s turn, while forcing your opponent to respect an effect that you might not even have to utilize. Your “waiting” turns are likely going to consist of only playing 1-stock healers, so don’t be averse to playing towards this effect if the gamestate or matchup demands it. You might even still have the stock to resolve a game-closing Shiki the next turn, even with this backup’s hefty cost.
“Sometimes You Just Want ACC” Shiroha
【A】[② Place 1 Character into Waiting Room from Stage] When you use this card's 『ASSIST』, you may pay the cost. If you did, choose 1 of your opponent's Character with Level higher than your opponent, place it into the Waiting Room.
【S】【COUNTER】 ASSIST 2500 Level 2[① Place this card from Hand into Waiting Room] (Choose 1 of your Characters being Front Attacked, during that turn, it gets +2500 Power)
Just like the Nomiki tap counter, slotting in this Shiroha instead adds a 2500 power backup to our deck to protect our early plays, but further threatens to fog our opponent’s attacks by hard-removing their own early plays. Again, since we’re playing Choice and stock charging effects, we’re able to more reasonably execute this effect more often than we probably should be. Realistically, you’d only choose to play this if you were attending an event where you might expect your opponents to not respect it, thinking that it would strain your resources too much to utilize. Personally, I find the Nomiki tap counter to be more effective as a defensive counter than this antichange, since our Tsumugi EP can clear most anything on our turn without issue, but your local meta might dictate that this card is necessary. Don’t worry about the extra stock it gives your opponent; it might feel bad in the moment, but removing an entire attack will nearly always play out in your favor. This Shiroha is also usable as a sac counter to deny your opponent’s on-reverse effects at end game, which is a nice bit of extra utility for a card you might not want to use in every game.
【C】If you have 4 or more 《サマポケ》 Character, this card gets -1 Level in your Hand.
【A】When this card is placed on Stage from Hand, you may place the top card of your Clock into the Waiting Room.
【A】[(2)] When this card is placed on Stage from Hand, if you have other Character with 「“夏の思い出”」 in its name, you may pay the cost. If you did, the opponent chooses 1 Climax from his/her Waiting Room, returns all cards from Waiting Room into Deck except that card, shuffle his/her Deck afterwards.
If you find yourself having a lot of stock-rich, long games where you feel you need a decompression effect, you can always slot in a single copy of this Shiroha. In addition to being a costly 1-climax Fumio, she’s also a 4-or-more early play healer, making her feel like less of a dead card in the games where you don’t have the stock overhead available for decompression. With the way Shiki works, pushing out multiple instances of one damage, I’ve personally never found the need to include this card, but sometimes having an extra healer around can be a nice inclusion since Shiki herself is a topcheck.
Brief Mulligan & Play Guide
For the mulligan, we’re looking for the basics:


If we happen to go first, we’re looking to throw out Kamome Riki on our first turn to start sculpting for level one. Going second, having a clean cut plus a decent target, like our Brainstormer, takes priority. Outside of these select few cards, keeping any additional level zeros and copies of our level one combo is totally fine. The most important part of mulligan is to throw any Photos events you happen to open; we run the Tsumugi bonder, so there’s no reason to death grip any of them in our opener when we could cycle them for more playables. If we happen to get any additional level zero turns, we’re looking to attack as many times as possible to increase the chance of triggering a Bar to confirm our combo. The Shiroha Rize can also help us move through some additional cards, filtering for combo pieces while also moving us through our first deck.

Level one is where the deck starts to take off running. As always, we’re looking to tear through our first deck as quickly as possible using our Kamome combo. Since Kamome swings in for large power numbers, we don’t care too much about hitting level one second, so our instances of moving 3 cards at a time will likely be enough. If it isn’t, we can use our Brainstormer to move through an additional five cards, especially if we haven’t managed to see many climaxes at level zero, increasing the chances for a first deck hit. This is also when we can start resolving our photos events, especially if we can confirm extra copies of our Kamomes. If we don’t happen to have triple combo, we can also look to resolve a Tsumugi blindstocker in our third lane to refund our Photos event and move through an additional card. In the event that we whiff our combo climax, shift focus to resolving more Photos to ensure you can win the field. You can utilize that extra power and the color-fixing from the Tsumugi bonder to go for a clean cut targeting your 1/1 Shiki support, since that’s a card you’ll be forced to play down eventually. This can help you conserve hand by plussing on field, lessening the blow from failing to resolve combo.

At level two, look to immediately play your Shiki EP if you still meet her early play condition. She’ll help fill your board so you can also throw out your first of many Tsumugi EPs, giving you two heals for three stock. Continue to resolve more Photos events alongside the bonder to filter your hand and pump power to your board, making sure your EPs always win their lanes on your turn. Repeat this process for as long as you can; SMP has the tools to stay at level 2 for quite a long time if your opponent can’t manage to push you to level 3, and you’ll want to play conservatively until Shiki can close the game. Always use the Tsumugi blindstocker when your opponent presents a reversible target, as that extra stock will convert directly into either more heals, or a more effective final turn. Take note of how many soul triggers you’re refreshing starting now, as you want to have the most accurate information you can going into level 3.


Level 3 is all about Shiki. If you haven’t managed to put down your 1/1 Shiki support, you’ll have to do it now to make sure you’ll be swinging in for 3 soul before you trigger. Ideally, your opponent is somewhere in that 3-0 to 3-2 range, where Shiki is practically a guaranteed win. If they aren’t there yet, continue to loop your level 2 gameplan, healing repeatedly the game advances to that point. If they are, use your Shiki’s topchecks to mill out your deck, finding both her own climax and the Shizuku shuffle-back if you haven’t managed to hold onto her already. Use the Shizuku to shuffle 2 soul triggers back into your now 1-2 card deck and attack in with your Shikis accordingly. If you want to attack with a Shiki first, you’ll need to have 1 stock available before you go into your attack step, but Shiki isn’t punished for not attacking with her first if you are only fielding 2 copies. Unlike finishers like Himari, Shiki’s ability only affects her attack, so you’re free to swing with your third lane first if you end up tapping out all your stock in main phase. With this play pattern, you’ll find much more success than just fielding Shiki when your opponent is at high level 2, no matter their current level of compression.
Conclusion
Hopefully this article has given some insight into just how powerful Summer Pockets can be. The combination of a consistent finisher, a strong non-interactive midgame, and the ability to stall with repeated heals make the set very attractive when choosing a deck to bring to a larger tournament. The set will likely stay relevant for quite a while because of this, especially when you consider the large amount of options it has to adapt to a changing metagame. Unless every new set gets a cheap, easily-accessible anti-damage counter, Shiki is surely here to stay.
Incredible article. One can sense the experience and the strength of the author in these explanations.
ReplyDeleteTwo questions:
(1) Obviously with the 1/1 event one risks clocking a climax. Do you always use (in practical play) the cleancut or the brainstorm to top check before using the event? It seems a bit risky not doing so in certain critical situations, but at the same time doing so every time one plays an event would slowly drain your hand.
(2) Regarding the level 1 combo. Obviously the opponent is going to choose for you (if he/she plays sensibly) a lot of "junk" cards (cleancuts, riki, etc...) that have almost no relevance for the next turn you are going to play. How do you deal with this in your games? Are you going to crash those cards in your next turn? Your thoughts and experience about the consequences of this poor selectivity in practical games would be greatly appreciated.
(3) I hope Summer Pockets will get a third set with a reasonable non-interactive level 1 combo and a level 0 climax swapper !!
Thank you for this wonderful piece of work.
Sorry for the late reply, I rarely check for comments since I never get any, so thank you for your feedback! As for your questions:
Delete(1) Almost never. A climax in clock is statistically unlikely, and with the Tsumugi bonder you are typically using the event as a delayed drop salvage. The card you will add off this event will likely always outweigh the statistically improbable downside of clocking a climax. However, it can and does happen. In compressed deckstates, where this is more likely, I typically play events before using the Tsumugi EP healer, which will be coming down every turn until you are ready to "shove all your chips" with Shiki to kill at endgame. This lets you heal an errant climax clocked to stock, and then pay it out. If you approach the random topdeck clock with a risk-averse mindset, where an errant climax clocked will result in destruction of your gamestate, it's best to simply hold back the event for when it is "safer" to utilize. Again, the chances of this are so statistically unlikely; it is best to approach these situations the same as you would any other situation where the card you will trigger or reveal will be "random".
(2) Kamome combo gets a bad rap for exactly this reason. Fortunately, our "dead" adds are extremely minimal. The Kamome maid riki is our only true whiff here, but that card will thankfully remove typically one copy of itself from the game, with another usually being swapped into clock by the Tsumugi bonder at a later point, lessening the chances we'll hit it in a top-2 check. Pretty much all of our other cards have value throughout the game: the cleancut allows us to snipe reverses and pull back prime targets midgame like our combo or 1/1 Shiki support, and the rize will give us some extra memory and panic mill if we need it. Even if the cards we end up getting off the combo are "useless", we can use that plus to fuel our Tsumugi bonders and EPs, both of which require us to ditch hand and are cards we're incentivized to resolve as much as possible throughout the game. This is also where the event package truly shines; where we can use sculpts proactively to get these cards which have a generalized hand cost, then using our Kamome combo's gains as fuel. While that covers most of it, one last note is that to remember that the cleancut can reveal our top trigger at endgame to inform our attack order, so that card can be extremely useful all the way up until your final turn.
(2.1) If you are lucky enough to be playing in a very directed local meta where you can reliably secure multiple reverses, playing Door / Choice with a splash of either the camera or freefresh events can be a good pivot. Umi is very good at securing reverses on 1/1s, especially if you shift your 0s around to include the level 0 Shizuku pumper. In my experience with long JP events hosted in NA, you can never predict what exactly anyone will play (with a lot of popular sets randomly picking Oboro combos as their level 1 of choice, or worse having access to JC like Grisaia) which has pushed me towards set 1 Kamome from the beginning. Kamome strikes a balance between anti-standby and non-interaction, whereas Umi is a directed meta call against board-based strategies.