Bofuri 8 Book Deck Profile
This is a deck profile I wrote for a now-defunct community project. Even if that project starts back up again, these decks are no longer meta relevant. I didn't want to lose the writing, so I'm copy-pasting them here. It's practically just an English adaptation of MilkTea's 8 Book profile, which is linked in the article itself. Enjoy over coffee at your leisure.
---
Sometimes, the most interesting cards in a set can be deckbuilding traps. Unique profiles with the potential to create powerful boards and present unanswerable threats are what players, myself included, usually will start with when trying to craft a “meta” deck. This typically works out; Weiss Schwarz is a game where available shells are pretty obvious to brewers before a set even comes out. Many sets come out of the gate with a canned build available that sticks to the meta like glue. However, there are times where this isn’t the case. The community can miss the proverbial forest for a set’s stand-out trees, struggling to force them to work rather than changing its deckbuilding approach. Bofuri was a perfect example of one of those times.
For that, I don’t think anyone could be blamed. Bofuri had some pushed individual cards that anyone would be raring to sleeve up and try. I’ll run these down quickly, along with their issues, so you can better understand what led to this deck’s creation. I’ll be leaning a lot on MilkTea for this one, as the ideas behind this deck’s construction are far from my own. Even if you can’t read Japanese, I heavily recommend reading his articles through Google translate; his deckbuilding prowess and easy-to-understand evaluations are second to none.

【C】If your Waiting Room has 2 or less Climax, this card gets -1 Level in your Hand.
【A】When this card is placed on Stage from Hand, you may place the top card of your Clock into the Waiting Room.
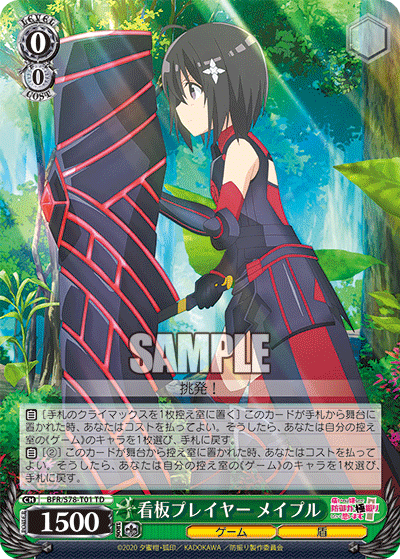
【A】【CXCOMBO】When this card attacks, if (Choice CX) is in your Climax Slot, and you have 4 or more other “Game” Characters, until end of opponent's next turn, this card gets +2500 Power, gains the following Ability. 『【C】The Character facing this card gets -2 Soul.』
Angel Maple was the go-to for many players on release. An early-play healer with the ability to give an untargeted -2 soul across while sitting at big power is a pretty desirable profile, and has seen success in the past in sets like Rewrite. To boot, the set has the 2/1 Kanade support that gives this specific card hexproof and has the ability to stock-costlessly spawn any card from the grave that you already have on the field. This lets you dodge a good bit of your opponent’s counterplay and spawn additional copies on followup turns even if you no longer meet the early-play condition. This all looks great on paper, but the core issue lies in looping the combo. If you miss even one turn of slamming Choice, this card is only a 9K attacker. While the set does have tools for finding climaxes, relying on a strategy like this adds a huge liability to the game plan. The meta also has more than enough answers available to turn off your neg-soul if you don’t manage to build the perfect “god board”. Combine that with repeated use of the high cost Kanade support to spawn more Maples, and the allure of this seemingly amazing wall starts to dull very quickly.
“I can’t believe it’s not neg-soul!” Maple

【COUNTER】Perform the following Action 2 times.
『Choose 1 of your Character, during this turn, it gains the following Ability. 『【C】The Character facing this card gets -1 Soul.』』
Send this card to Memory.
A cornerstone of the Standby builds, the Wooly event allows Bofuri to leverage its insane amount of extra generated stock from the 2/2 Misery Cocytus clone to extend the game to unnatural lengths, hopefully grinding out an eventual victory. This synergizes with the general Standby gameplan of winning board, letting you delete multiple lanes of damage, or at the least it forces your opponent to slam climaxes just to get any damage through. The issues arise when you realize that your only access to this card is to either draw it or nab it off of the set’s 0/0 Maple Chiyuri. Not only that, it will also slowly delete itself from your deck. Unlike Date-A-Live’s computer chip counter, this is a card that’s meant to be and has to be resolved multiple times per game in order for Bofuri to generate enough advantage through extra turns of swings. Without any climax combos to help you recoup hand in the standby builds, prioritizing sculpts for this card over playables will leave you high and dry for resources more often than not. Even if you manage to ramp out a bunch of 1/1s early, which is Standby Bofuri’s biggest strength, you’ll likely fall behind if you don’t manage to resolve 2+ of this event every game. A lack of impactful Standby targets past level 2 also doesn’t do this build any favors, so it was also scrapped.
Taking a Step Back
So, if we drop all of these seemingly strong options due to their inherent problems, what are we left with? Thankfully, Bofuri still has a slew of strong cards, even if they might be a little bit more on the “vanilla” side. What’s not vanilla about the set though, is access to this card:
“My Little Game-Breakers” Maple & Sally

【A】[Place 1 card from Hand into Waiting Room] When this card is placed on Stage from Hand, you may pay the cost. If you did, choose 1 opponent's Character with Level 1 or higher, opponent chooses 1 Character with Level X or lower from his/her Waiting Room, exchange them. X is equal to your chosen Character's Level -1.
If you have kept up with meta discussion in either EN or JP lately, you’re probably sick and tired of hearing about “My Little Shido''. Level-down is a rare but extremely powerful effect that can create a massive swing in your favor if your opponent doesn’t respect it, and Bofuri has access to it on a stick. By being on a character we don’t have to dedicate a large amount of deckslots to this card to effectively make use of it, as level-down can be a dead effect in matchups where your opponent isn’t heavily investing in their board. Letting us ditch any card is also relevant here, as it can let us trade errant climaxes, events, or otherwise dead cards for a win on board. When the situation asks for it, you can easily grab this card and nuke your opponent’s threat or backrow supports without a care in the world. It will probably sound a little negative to say that this is the card worth building around in all of Bofuri, but sometimes that’s just how the cards fall.
Decklist & Card Explanations
Without further ado, let’s get into the decklist:

Probably looks a lot different from Bofuri decks you’ve seen before, right? Notice the 8 plussing triggers; while Book isn’t the best plus we could ask for, it still helps keep up our hand all the same. With a big hand, we can afford to throw away cards we don’t need to freely utilize level-down, keep our 2/1 Maple beater around, and fuel our finishing combo. We’re also proudly one color, adding to the list’s already high consistency. Since the other builds all had some pretty nasty fail cases when things didn’t go exactly as planned, this one aims to bring up Bofuri’s floor as high as possible, even if it concedes most of the set’s more unique options.
4x “Thank God She Got a Good Card” Iz

【A】[(1) Place the top card of your Deck into Clock] When this card is placed on Stage from Hand, you may pay the cost. If you did, search your Deck for up to 1 Character with Level 1 or lower and show it to your opponent, add it to Hand, shuffle your Deck afterwards.
【A】When your other Character's battle opponent becomes REVERSE, during this turn, this card gets +1000 Power.
Pretty simple pick for a staple 4-of here. Regardless of personal preferences for 3 or 4 Rikis, it can’t be argued that running 4 will be more consistent. Extra power pump when your other characters score reverses is nice, it helps the card feel less dead later on. We’ll use this to help us sculpt for level 1, as Iz can grab our level 1 Kanade or even our Frederica Koume to help us get into our climax if we don’t already have it. Furthermore, she enables those good turn 2 trilanes for extra stock and attacks without nuking your hand. This list is one that would prefer to hit level 1 second so that it can use its on-turn power to clear its opponent’s board, even in Standby matchups.
4x “Character You Forgot Existed” Shin

【C】All your Character gains the following Ability. 『【C】This card cannot Side Attack.』
【A】At the beginning of your opponent's Attack Phase, you may move this card into an empty slot at Front Row with an opponent's Character facing it.
3500 is right where we want to be if we’re opting to play a chaser. With the amount of clean-cuts running around in the meta, this card is at even more of a premium, completely turning them off. Chasers also help us slow down the 0 game by stopping our opponents from being able to direct attack when we might not want them to. He perfectly synergizes with our preference to hit level 1 second and increases the chance that we get that sweet, sweet second turn at level 0 to slam our Iz Riki if we happen to go first. If we happen to open our Mii brainstormer as well, that’ll put Shin to 4500 in the center lane, making it even harder for our opponent to deal with.
3x “Smart Boy With Hot Dog” Kanade

【A】When a Climax is placed into your Climax Slot, choose 1 of your Character, during this turn, it gets +1000 Power.
【S】BRAINSTORM [(1) REST this card] Flip the top 6 cards of your Deck, place them into Waiting Room. If there is a Climax with Book Trigger Icon among those cards, choose 1 “Game” Character from your Waiting Room, return it to Hand.
These kinds of profiles are usually not worth running, but Kanade’s got a lot going for him in this specific deck. Unlike other printings of this extended-mill Brainstorm profile, this one is a self-tap, meaning you can combine it with another utility card in the back row if you wish (like an additional, different Brainstormer). Moving 6 cards instead of 4 lets you turn on the turbo when you need to and heavily increases the chance that you’ll get a selective plus from your grave on first deck. Remember, we want on-demand access to our level-downer if the situation calls for it; and on later decks, milling 6 for just one climax is practically a guarantee. Great for the situations where you desperately need a single plus, but only milling only 4 cards is a bit too much of a gamble. +1000 power on climax play makes our power output throughout the game even more obnoxious for our opponent, making Kanade an all-around great card to chill in your back line all game long. Keep in mind that no matter how many climaxes you hit with this Brainstorm, you’ll only get to salvage one character.
2x “Which Twin Was This Again?” Yui

【C】This card cannot Side Attack.
【A】[(1) Place 1 Climax from Hand into Waiting Room] When this card is placed on Stage from Hand, you may pay the cost. If you did, choose 1 Climax from your Waiting Room, return it to Hand.
A climax swapper that functions as our 5th and 6th starter. One of Bofuri’s notable deficits as a set is that it doesn’t have access to a good form of main phase digging to get into climaxes, so a swapper is one of the best ways to rectify that. Since we have the ability to mill a lot in this list, oftentimes we can mill the combo climax we prefer into our grave, then use this to swap for it with the wrong one we happened to draw for turn. A good consistency card for any deck, but the added functionality as a beater throws it over the edge. We already can’t side attack when our chaser is down anyway, so Yui’s drawback is completely meaningless to us.

【C】 Your other Character with Level 0 or lower at the Center Slot of Front Row gets +1000 Power.
【S】BRAINSTORM [(1) REST this card] Flip the top 4 cards of your Deck, place them into Waiting Room. For each Climax among those cards, choose 1 《ゲーム》 Character from your Waiting Room, return it to Hand.
Our other Brainstorm pick. When our deck is compressed, we want to open up the ability for us to plus harder than just 1 card off our mill. Grabs from grave just like Kanade, so the decision for us to tap down one or the other is purely based on deckstate. Also makes our other 0s obnoxious if we happen to open with it, and an excuse to put BEST GIRL in the deck.
2x “On-Play Koume Was Too Strong” Frederica

【A】When this card becomes REVERSE, look at up to 3 cards from your top Deck, choose up to 1 Climax and show it to your opponent, add it to Hand, place the remaining cards into the Waiting Room. If you added it to Hand, choose 1 card from your Hand, place it into the Waiting Room.
Oh Koume, how far you have fallen. There’s no denying that on-reverse mill for climaxes is the worst possible timing for this effect, but climax assurance is climax assurance, and this effect has been nerfed for a reason. If you fail to open up your climax in mulligan, using your Iz Riki to grab this Frederica to give you a greatly increased chance at grabbing one is a good line. Adding any climax is probably enough to get us there, since we mill so much starting at level 1 and have access to a good climax swapper that we run at a two-count. She can also be used to help dig into your finisher climax on your level 2 turns, but milling into a likely compressed deck during battle phase can be a bit scary, so be sure to assess your deckstate and use her with caution.
[A] [Discard a Climax card from your hand to the Waiting Room] When this is placed from hand to the Stage, you may pay cost. If so, choose a ::Game:: Character in your Waiting Room and return it to your hand.
[A] [(2)] When this is placed from the Stage to the Waiting Room, you may pay cost. If so, choose a ::Game:: Character in your Waiting Room and return it to your hand.
Books are always going to draw more books; it’s a fact of Weiss. Jokes aside, a climax filter with an on-death plus is just a great utility card for any list. Always a good pickup off your Camera mills or Mii Brainstorm, this card is better than most climax filters early on since you can swing her into an open lane, see how the damage falls, then decide if you want the pay-2-plus before you go into your turn proper.

【A】[Place 1 card from Hand into Waiting Room] When this card is placed on Stage from Hand, you may pay the cost. If you did, reveal the top card of your Deck, choose 1 Character with Level X or lower from your Waiting Room, return it to Hand. X is equal to the revealed card's Level. (Climax is considered Level 0. Return revealed card to its original position)
One of the better costless filter profiles. While on-play Riko isn’t really the most selective kind of filter, since you can’t know your top card in advance, it’s a good way to get dead cards out of your hand. At the very least she will always get you a playable card, since you can always grab a level 0. Revealing your top card is also nice, as it can help you set your optimal attack order.

【A】【CXCOMBO】When (Book CX) is placed into your Climax Slot, if this card is at Front Row, and you have another “Game” Character, choose and perform 1 of the following 2 effects.
『Choose 1 (Camera Event) from your Waiting Room, return it to Hand.』
『Search your Deck for up to 1 (Camera Event) and show it to opponent, add it to Hand, shuffle your Deck afterwards.』
【A】When this card attacks, choose 1 of your “Game” Characters, during this turn, it gets +1500 Power.
Similar to Sachi, Kanade adds his topcheck event to your hand, from either your deck or your grave, the second you play the climax so you get all your practically guaranteed plusses immediately. Since we have some strong card effects in our deck that let us pitch any card, the raw plus is useful even if we don’t want to use the Camera events. Having an on-demand mill option on our following turn is always good if we didn’t manage to get through the deck before our first level 1 turn. The power pump he offers is also deceptively strong, and when combined with additional pumps from your other cards, he lets you swing over even Standby decks without issue. Again, the thing to remember here is that we’re looking for a consistent, stable plus that’s not completely dead if we somehow don’t manage to get our climax combo at all, unlike Bofuri’s other combo options.
2x “My Little Game-Breakers” Maple & Sally
【A】[Place 1 card from Hand into Waiting Room] When this card is placed on Stage from Hand, you may pay the cost. If you did, choose 1 opponent's Character with Level 1 or higher, opponent chooses 1 Character with Level X or lower from his/her Waiting Room, exchange them. X is equal to your chosen Character's Level -1.
I already spoke on this card above, so instead I’ll focus here on the count. For a card we’ve decided to shape our deck around, only running two copies might seem a bit suspicious. Remember, despite its power, level-down is still a somewhat niche effect. In matchups where your opponent isn’t investing resources in their board, this card might not be very useful. We have very good access to this card when we do need it with our 6-card salvage Brainstorm, so only two copies is more than enough to ensure that we can resolve it every turn if need be.

【A】When this card attacks, choose 1 of your other “Game” Characters, during this turn, it gets +X Power. X is equal to the number of your other “Game” Character x500.
Your basic Shima-kai profile and our best option for an on-color auxiliary level 1 attacker. Helps us win board whenever we want to with all our power pumps, namely with our level 1 Kanade combo and our early-play healer.

【A】When this card becomes REVERSE, if this card's battle opponent's Level is higher than your opponent's Level, you may place that Character to the bottom Deck.
Your standard Adachi, but this one sends to bottomdeck. Good for dealing early plays you can’t beat over, or annoying ones that have hand encore. Efficient at one cost, and we don’t care much to win board on our opponent’s turns anyway, so a perfectly good option as a tech.
4x Camera

Look at up to 4 cards from your top Deck, choose up to 1 “Game” Character and show it to opponent, add it to Hand, place the remaining cards into Waiting Room.
Topcheck mill up to 4 for any character. Good at letting us costlessly get out of poor deckstates while finding us cards that are still trapped in our deck. In the deckstates where we aren’t looking to mill, usable as fodder for our level-downer and 2/1 Maple beater below, so there’s no need to “Destroy Deck December” just to get use out of it.
2x “Satanic Chibi Monstrosity” Maple

【A】When this card attacks, if you have 4 or more other 《ゲーム》 Character, choose 1 of your Character, during this turn, it gets +2 Soul.
【A】[Place 1 card from Hand into Waiting Room] During your opponent's turn, when this card becomes REVERSE, you may pay the cost. If you did, REST this card, at the beginning of your next Encore Step, place this card into your Waiting Room.
One of the most important cards in the list, right after our level-downer. Soul pump to this degree for no real cost past playing the character down is fairly rare in Weiss, and it has the obvious use of punishing your opponent for their poor deckstates without requiring you to slam a climax. The less obvious utility of the card is when it’s combined with our Sally restander combo. This card pumps soul anywhere on-attack, so we can use it to modulate our damage for optimal swings and set up nasty side attacks. Those side attacks can let you ignore problem cards at level 2, get around defensive neg-soul and Money counters, or even side first to nullify a possible memory-kick backup aimed at your restander. The pseudo-encore effect is also insanely useful, letting us slam this Maple down at 2, then pitch any card to keep her around for our finishing turns. You can use those extra Camera events, or even ditch extra climaxes you might have drawn into during your last attack step. Since she rests herself during the battle step, she also denies any form of pseudo-Fever, which isn’t that relevant right now in the meta, but could be in the future. This Maple is a massively over-performing card that you are aiming to play down in every game, so make sure you prioritize sculpting for it.

【C】If you have 4 or more “Game” Characters, this card gets -1 Level in your Hand.
【A】When this card is placed on Stage from Hand, you may place the top card of your Clock into the Waiting Room.
【A】When this card is placed on Stage from Hand, if you have another “Game” Character, during this turn, this card gets +2000 Power.
Not an amazing card by any means, but our only real option for a stable early-play. 4-or-more condition lets us freely use our Camera event to stay on top of our deckstate without worrying about nullifying our condition. Swings in big, even bigger with our available power pumps, so he’s a good way to clear our opponent’s board while healing down in the midgame to give us more turns of attacks. Just a stable, safe card; not much else of note here.

【A】[(1)] When this card is placed on the Stage from Hand, you may pay the cost. If you did, place all cards from the opponent's Stock into the Waiting Room, and the opponent places the same amount of cards from his/her top Deck into Stock.
【A】【CXCOMBO】 When this card attacks, if (Pants CX) is in your Climax Slot, place 4 cards from opponent's bottom Deck into Waiting Room, deal X Damage to opponent. X is equal to the number of Climax among those cards.(Damage can be cancelled)
Basic on-play stockswap. Our only real form of decompression in Bofuri, so we have to play it. If we didn’t run this card, our opponents would be free to stock-compress on us, severely decreasing the effectiveness of our restanding finisher. We don’t play the climax combo, but the first effect is more than enough of a reason to include it. Only sculpt for this card when your opponent is having a stock-rich game where you’ll have the opportunity to use the effect to its fullest potential. Since it’s a level 3, your opportunities to catch your opponent in poor deckstates where stockswap will be most effective is severely lessened, so keep that in mind.

[A] When this is placed from hand to the Stage, you may put the top card of your Clock in the Waiting Room.
[A] When this attacks, if you have another ::Game:: Character, this gains +1500 Power for the turn.
[A] CX COMBO [(2) Discard 2 cards from hand to the Waiting Room] This ability activates up to once per turn. At the end of this card's Attack, if (Book CX) is in your Climax Zone, you may pay the cost. If so, Stand this.
A fairly boring finisher, but an effective one nonetheless. An on play heal and an 11K swing gives this card a decent floor when fielded without its climax combo, letting you effectively wait a turn if you didn’t happen to get into your needed climax. Usually a restander wouldn’t be playable with the number of high quality defensive counters running around, but our 2/1 Maple soul pumper alleviates that issue by letting us set up the side attacks we need to close games effectively. Typically, you’ll only be looking for field two of this finisher, as going for triple will require you to either hit a multi-plussing Brainstorm or trigger a few Books. Restanding also lets Sally’s self power pump effect go off twice, letting her hit over most walls. This one only comes as a two-of in the trial deck, so you’ll need to either pick up two TDs or find some singles.
Mulligan & Brief Play Guide
As this deck is more on the vanilla side, it’s a bit easier to pilot than some of the other decks out there. Mulligan is especially easy; you’re only looking for the following cards:

If you already have these pieces, you are free to keep copies of your level 1 Kanade combos or cards important for specific matchups, but these are the main things that you’re looking for. Shin chaser will help you control the 0 game, running in front of your opponent’s lanes to prevent direct attacks. You can use that extra turn Shin nets you by playing your Iz Riki to help you sculpt for your level 1 combo turn.
At level 1, go ahead and resolve as many copies of your Kanade combo as you can while winning board. With your rolling pumps from Kanade himself, as well as assists from your Kanade Brainstorm and Oboro Shima-kai, you should have no trouble beating over even Standby decks here unless they’ve somehow already assembled an army of 1/1s. Ideally, you’d like to refresh on your first level 1 turn like most decks; if your deck is still in a decent state, you can use your Camera events the following turn to mill yourself out. This is where you should start looking for good opportunities to abuse your level-downer, if the matchup demands it.


The only caveat at level 2 is ensuring you are always monitoring your stock threshold. You’re going to want 5 stock coming back to your turn to double Sally combo, more if you decide to utilize your stockswap or are forced to play a 2/1 Maple from hand. We want to avoid having to attack with our third lane first, so that we can make the best, reactive use of our 2/1 Maple’s soul pump. More often than not, you will have to clutch your finisher climax if you happen to draw it during this stage of the game. Bofuri, as mentioned before, doesn’t have good options for cantrips, so we’ll have to deal with refreshing one less climax. You can mitigate this by holding an extra climax swapper, or even playing down your Frederica Koume to look for a climax. Other than that, slam your early-play healer and the 2/1 Maple and go to town while trying to win board as best you can. You still have access to a lot of power pumps, so winning most lanes should be fairly easy.
Once you hit level 3, you have to make the decision to either wait or go for the game. Remember that your Sally combos are also healers; they can help buy you an extra turn if your opponent isn’t in a killable state. After you’ve gone for double Sally combo, you likely won’t have an adequate followup if you happen to live through your opponent’s responding onslaught, so don’t be afraid to take more conservative, heal-based lines of play at the top.
Wrapping It Up
Like I said at the beginning, Bofuri is a good example of a set where the most initially attractive options didn’t pan out when trying to create the most competitively competent build. This sort of deckbuilding typically requires a lot more testing than your average set, with the lists coming out the other end looking wildly different than what the community has expected. If MilkTea had never published his notes on the list, a build like this would have probably been ignored entirely since it’s not running any of the flashier cards present in most of the other builds that were being discussed. It’d be best for Bofuri to stand as a warning to the community: don’t be afraid to sleeve up a list that you don’t fully agree with, or do your own testing with options the community has written off. You might just find something great out there.
This article is heavily inspired by the efforts of MilkTea in creating and refining this shell for Bofuri. Please give him some support with a follow. His notes are incredibly helpful to newer and experienced players alike, even if you can’t read Japanese.
Comments
Post a Comment